
Adding Motors
The first step in motorising a mount is adding the motors itself. The most common type of motor used in this type of upgrade is a NEMA 17 stepper motor. These types of motors have standardised dimensions and allow a controller to have the motor make precise changes in position. That is also how they differ from normal DC motors that don't allow you to change the position in a precise manner.
There are three ways to mechanically connect the motor to the driveshaft of the mount: direction connection, belt drive and gear drive. Direct connection and belt drive are the recommended methods due to them having no or almost no backlash. The advantage of the belt drive is that you can add extra gearing to your mount. If you use for example a 20 teeth pulley on the motor and a 60 tetth pulley on the mount driveshaft, you can add an extra 1:3 reduction. If the extra reduction isn't needed and it is easier to mount the motor in line with the mount driveshaft, then a direct connection can be used.
There are motor kits available for some mounts. They may be an easy option if you don't have (access) to a 3D printer or you just want to buy something off the shelve. These kits can also be bought together with preconfigured OnStep controllers, making it a full plug-and-play experience.
3D printed motor mounts
EQ3-2 (CG-4) NEMA 17 Mounting Brackets
Saiti on thingiverse made excellent mounting brackets for NEMA 17 motors for the EQ3-2. Downside is that they use some harder to get GT2 belts.
Bill of materials:
- 2x NEMA 17 motors (use 0.9 degree / 400 step models with high torque)
- 8x M3x12 bolts
- 8x M3 washers
- 2x M5x16 bolts
- 1x M5 nut
- 3x M5 washers
- 2x GT2 48 teeth pulley wheel
- 2x GT2 16 teeth pulley wheel
- closed loop 172 mm belt
- closed loop 136 mm belt
Can be printed with any printer that fits these parts, keep infill high so that bolts can be tight. 60% as mentioned on the thingiverse page might not be enough. Print the parts in the following orientation to add strength where the M5 bolts go.
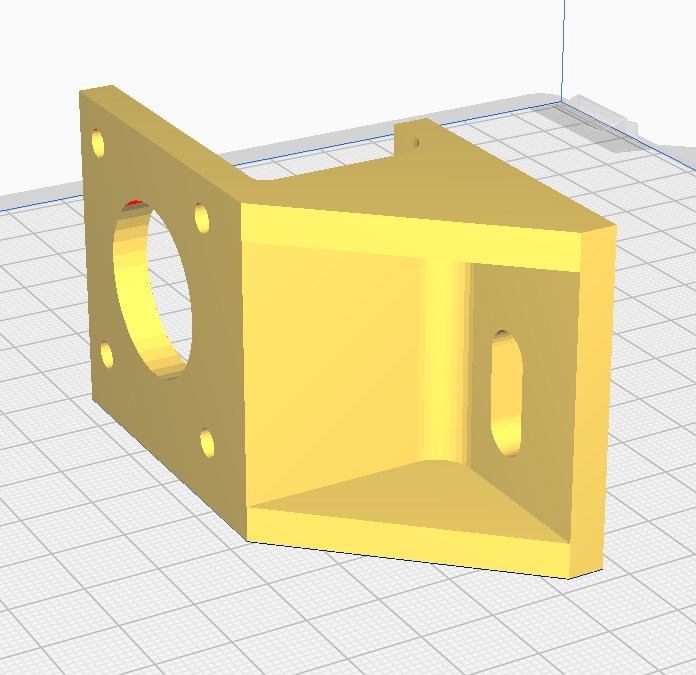

Do note: this model does not come with any mounting points for connectors. You might have to model some mounting brackets for those and glue them on, there should be enough space for that on these motor brackets.
Backup of models: DE_v4_176_rounded.STL RA_EQ3-2.STL
No Comments